On Vacation and having Fun!!!
I will still be able to check my emails!!
Will return for more DIY's, Sewing projects, and plenty of REDO Furniture as soon as all the Camping Clothes are Washed!!
Monday, August 29, 2011
Wednesday, August 17, 2011
Hot August Nights
Hot August Nights in Reno 2011 was August 9 through August 14. The 25th anniversary of Reno's biggest event of the year is a celebration of everything to do with classic cars, vintage rock 'n roll, and the American era of the 50s and 60s when cruising, sock hops, and high school proms were all the rage. Hot August Nights is a party that takes over the town during its run. Classic cars fill the streets, rock 'n roll fills the air, and entertainment galore makes Hot August Nights the premier fun festival in Reno
I thought I would share some of the classic cars at the event! We had Company visiting so what would be better than this? Of course, maybe Gambling in the Casino's!


I thought I would share some of the classic cars at the event! We had Company visiting so what would be better than this? Of course, maybe Gambling in the Casino's!
 |
| That's my handsome husband |
 |
| And that's me! |


I have so many more pictures, but just want to share a
few with you on this summer event in Reno, Nevada
The classic cars are so Shabby Sweet, would love to have one!
Saturday, August 13, 2011
UPside Down In Love!!!
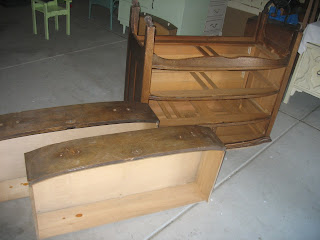
I really did fall for this piece!
This Girl put a smile on my face!
After


 she rolled out of my life to be a
baby dresser with a changer
on top!
Linking To:
http://missmustardseed.blogspot.com
http://thediyshowoff.blogspot.com
http://funkyjunkinteriors.blogspot.com/
This Girl put a smile on my face!
After
 |
She needed a little reinforcing and some hardware but I could not wait to paint her my plan of pink and distressed!! BEFORE |


baby dresser with a changer
on top!
Linking To:
http://missmustardseed.blogspot.com
http://thediyshowoff.blogspot.com
http://funkyjunkinteriors.blogspot.com/
Monday, August 8, 2011
Moron Spammers ---- Don't reply if in Doubt!
Don't Reply if in Doubt! Delete Delete!
Have you ever wondered why there are spammer's For the life of me, I don't get it? It must be they are some really unhappy people trying to make others unhappy? Personally, I really don't have time for the like, just enough time to express my thoughts! I have noticed, especially on Craigslist, which I list some of my Shabby Redo, they really like to attack! I don't get as many on my emails, or Blog comments, well Not yet, we will see after this?? But even received one on Pinterest, which I have not even finish setting up yet! I shy away from facebook and twitter so far, but thank goodness I have a good Anti Virus Program.
Don't reply if in Doubt, Delete Delete! But do check where the Spam goes on your email account, good emails have found their way there!
Back to the Spammer Morons who can't spell, or make any sense, their emails stand out, I know they have a brain due to the fact they are using the computer. If they put the time and energy in another direction, I am sure they would feel better about themselves. Well maybe not, since they don't have a heart! They are as tasteless as the food Spam!
I feel for so many on Craigslist, they say please don't send me any emails----spam---just call me!
Pretty sad!
Have a spamless day!
Saturday, August 6, 2011
Sew Time! Chalk Board
I found this from a thrift store !
 When I bought it, it did not have chalk board paint on the bottom, it had disappeared?? That must be why it was not wanted?? I wanted it!!
I wanted to try doing a chalk board so this piece looked perfect. See what you think?


Now I must list my sewing
projects and get going!
Linking to:
http://acreativeprincess.blogspot.com
http://funkyjunkinteriors.blogspot.com
http://debbie-debbiedoos.blogspot.com/ Newbie Linkie Party
http://linda-coastalcharm.blogspot.com/ Nifty Thrifty Tuesday
 |
| BEFORE |

I wanted to try doing a chalk board so this piece looked perfect. See what you think?
 |
| AFTER |


I found by putting 4 coats of chalk board paint and waiting the 3 days before using, did work!
and adding a magnetic top finished it for me!
Beware: After using this paint, you start looking everywhere to USE IT!
Now I must list my sewing
projects and get going!
Linking to:
http://acreativeprincess.blogspot.com
http://funkyjunkinteriors.blogspot.com
http://debbie-debbiedoos.blogspot.com/ Newbie Linkie Party
http://linda-coastalcharm.blogspot.com/ Nifty Thrifty Tuesday
Monday, August 1, 2011
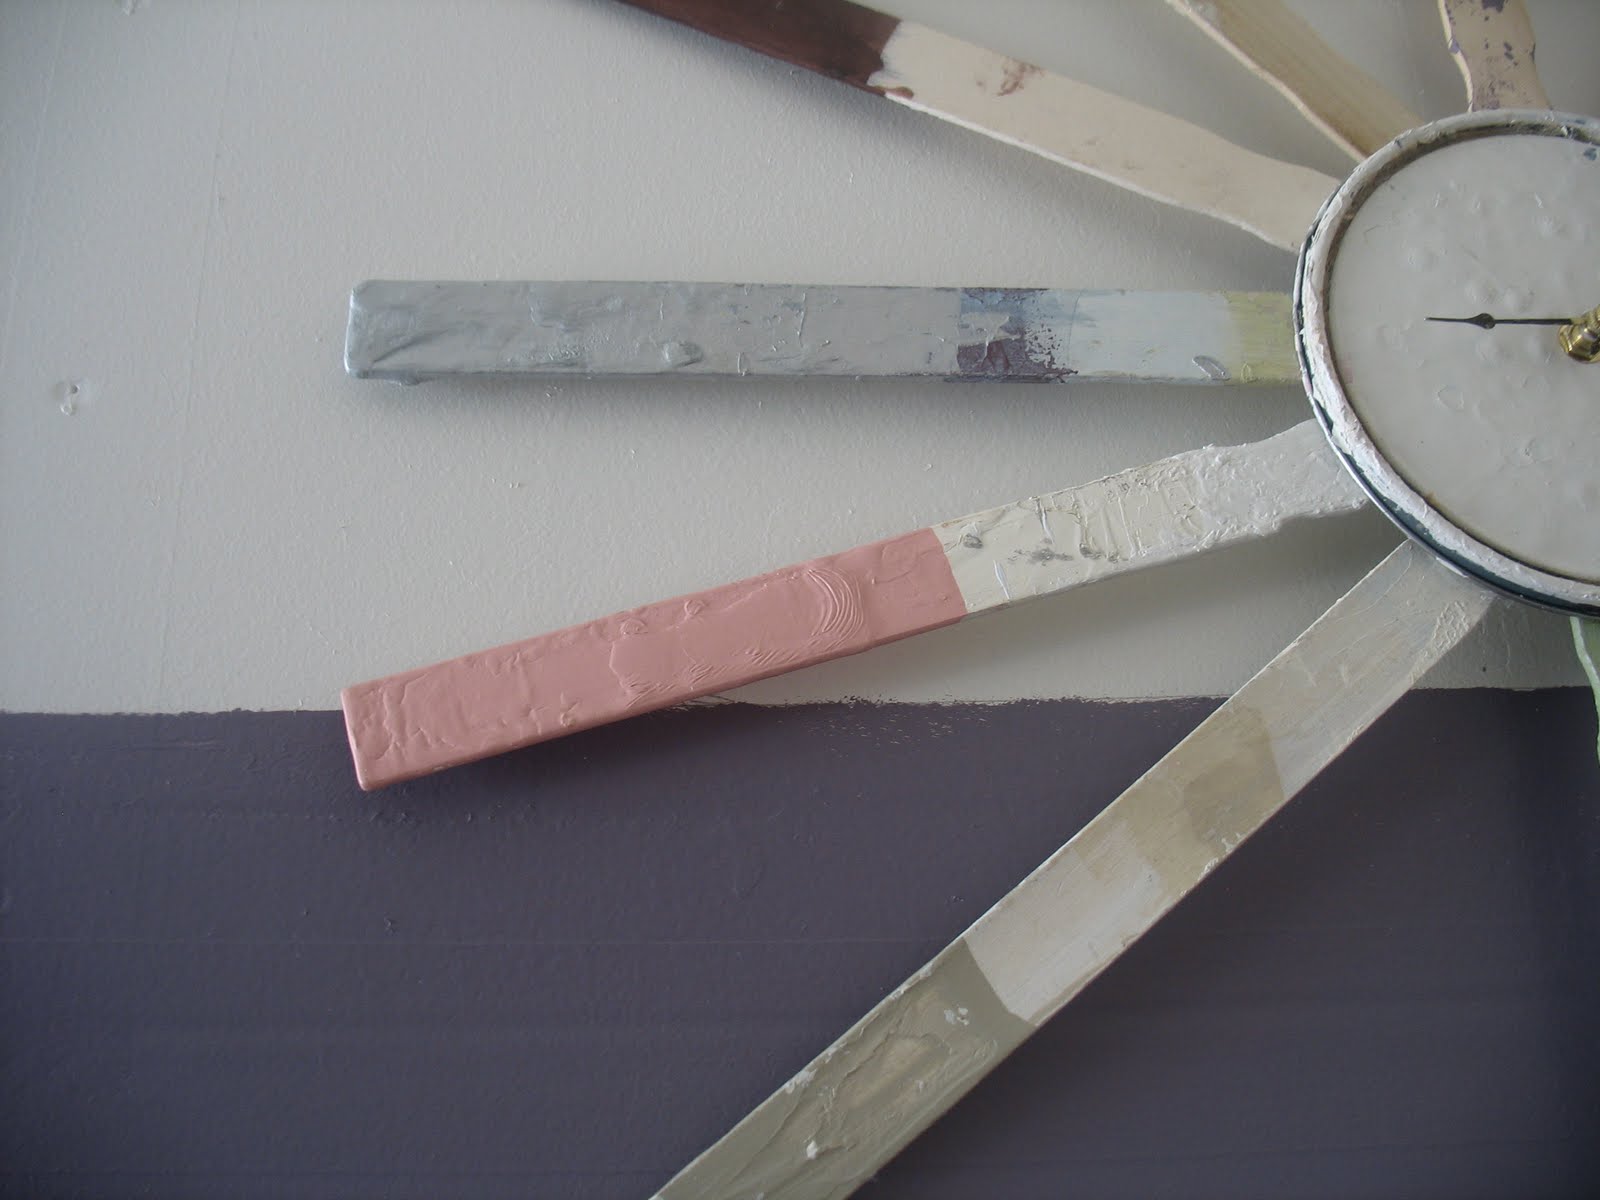
Sunburst Paint Stick Clock DIY
PAINT STICKS, PAINT STICKS, PAINT STICKS!!!!!!!!!!!
How many times did I want to know the time when working on my Redo Furniture, always with messy gloves full of paint trying to use the cell, not to mention going in the house with paint tracks from my feet or gloves to check on the time. SOLUTION a clock in the GARAGE!!!
Now I have seen sunburst mirrors in magazines and from DIY bloggers, why not a sunburst clock from all my messy paint sticks??
BEFORE
AFTER


 The clock is hanging on the only bare wall in the over stuffed garage from my Shabby Stuff, Husband Stuff and More of my Stuff..... The only clear spot is where he parks, that's what keeps the peace!
So the paint job you see on this wall was done quickly, I had to do something to cover the sheet rock and tapping on the wall for some photo's. Unfortunately I am unable to get big pieces of furniture into the house for photo's!
I am just lucky enough to get them into the garage and the doors down before everyone can see the mess!
Thanks for looking! Time to Go!
I am linking in 2012 to:
http://commonground-debrasvintagedesigns.blogspot.com/
http://bec4-beyondthepicketfence.blogspot.com/
Linking to:
http://funkyjunkinteriors.blogspot.com/ Best of 2011
How many times did I want to know the time when working on my Redo Furniture, always with messy gloves full of paint trying to use the cell, not to mention going in the house with paint tracks from my feet or gloves to check on the time. SOLUTION a clock in the GARAGE!!!
Now I have seen sunburst mirrors in magazines and from DIY bloggers, why not a sunburst clock from all my messy paint sticks??
 |
| I LOVE IT!!!!!!!! More pictures below, cuz it makes me smile and so handy now!!! |
 |
| OK, Now Guppy lumpy paint sticks from my Redo's plus 1 paint lid some hot glue and of course from Michael's a clock part! |
 |
| It was hard to wait for the glue to dry, so anxious to put the batteries in, hurry, hurry hot glue! |


So the paint job you see on this wall was done quickly, I had to do something to cover the sheet rock and tapping on the wall for some photo's. Unfortunately I am unable to get big pieces of furniture into the house for photo's!
I am just lucky enough to get them into the garage and the doors down before everyone can see the mess!
Thanks for looking! Time to Go!
I am linking in 2012 to:
http://commonground-debrasvintagedesigns.blogspot.com/
http://bec4-beyondthepicketfence.blogspot.com/
Linking to:
http://funkyjunkinteriors.blogspot.com/ Best of 2011
Monday, July 18, 2011
Button Plugs Saved the Redo!
 |
| BEFORE Do you see the button plug missing? Don't be afraid to purchase an ugly unwanted piece due to this small defect! |

 |
| Sanding drawer fronts and top for staining! You can see I work where ever I can! |
 |
| Now this is the little hole that the bellow button plug will fix everything they come in different sizes and of course Home Depot or Lowe's my fav's have them |

 |
| In this picture, it looks larger than the other buttons but it is just right! Don't ya love wood glue! |
 |
| You can see the stain I used, LOVE IT! |


 |
| OK, Now I wanted to try the fabric to cover the drawers as some clever bloggers have done! I found a little secret, The hard way! My first attempt, the fabric was a little wrinkled, even with my cute little roller! As I was applying the mod podge and using some water for my sponge for application the mixture was milky SO I dipped the fabric in the water and squeezed out the excess and put the fabric in the drawer on top a little mod podge waiting and :) it went on wonderfully and no wrinkles at all |
 |
| Kitty "Reno" I thought was asleep, but he does not miss a project! |
 |
| "No" don't drink that! |
 |
| AFTER |


 |
| Spare Bedroom, yes nothing on the wall yet, I will get to it! |
 |
| By adding this to the room, I now have two night stands! I am glad I kept this one! I also used the Vaseline technique on the black! On to the next project :) |
I hope this Redo may have helped someone, any questions, just let me know!
Linking to:
http://funkyjunkinteriors.blogspot.com/
Saturday, July 16, 2011
Light My Fire! Matches DIY
I have an easy Decor Idea which I love, since I have Matches that I have collected since 1969 and they have been in a plastic bag from Home to Home!
 Finally, I put them in a Big Jar! I have gotten so many compliments plus the conversations from the matches that they can see through the jar. I love it and finally they are being seen and not just a collection that is out of site.

Tuesday, July 5, 2011
New Available Side Table
I knew this piece had great possibilities, heavy, sturdy and look at all the drawers, not to mention the 2 door cabinets, I considered removing the doors for baskets? But pictured it painted with the wood cut outs adding a special look for the piece. This piece could be used for a Side Table or Buffet?

I

I sanded the top and used Mini Wax Rosewood stain, then Mini Wax wipe-on-poly, which I love, so easy to use. The bottom was painted with a creamy Beige and distressed with sanding paper and also a sanding block. I did replace the original hardware, but not all the pieces. I like the results and my supervisor kitty "Reno" does too! It looks possibly a little French or Shabby Tuscany?
AFTER A
AFTER A
 .
.


I love the great pictures you blogging gals take in the home, all lovely and model home style. I am jealous, but excuse by garage scene photo shots on most of my pictures! I did paint one garage wall covering the drywall and tape with extra paint! Only the light items can be taken outside or inside for photo's! Where is that good looking strong guy when you need them?? I have looked right and left from the garage, no one in site when I am struggling!
Thank you for looking, now on to the next piece!
Linking To:)
http://primitiveandproper.blogspot.com/
http://modvintagelife.blogspot.com
Thank you for looking, now on to the next piece!
Linking To:)
http://primitiveandproper.blogspot.com/
http://modvintagelife.blogspot.com
Subscribe to:
Posts (Atom)