Friday, December 19, 2014

Christmas Decor and DIY for 2014

                        CHRISTMAS TIME AT OUR HOME
                                                  2014

I feel like the Rabbit in Alice In Wonderland
I'm Late I'm Late for Christmas Eve!

Each day so much to do!  Tis the season to be BUSY!


Sheba just had to get in the picture with my Santa
theme Decorated Tree


The topper used to be on Wine, just love it for my Tree


Vintage Bulbs dear to my heart, found these with my late
Brother Antiquing.

Anyone remember this cookie jar?  I have had it since early
1970's


Wooden and Paper Mache oldie   

Round vintage tablecloth on square table,
also vintage table runner hung for a curtain.
Enjoy seeing these out and using.


A Vera find.


DIY Christmas Card Place mats.  More on them HERE 


DIY Cookie cutter Feather Tree


My favorite Chalk Board Rooster even has a Christmas cap! 


Vintage from the 70's


Mantel Scene with Santa decoupage on fence boards, peppermint candy hot glued to candles and leopard fabric strips glued on Christmas bulbs.


Santa twinkles with lights that change colors 
Easy tree made of gift boxes.


I'm off and running, thanks for stopping by!

Thou it's been said many times
and many ways
Merry Christmas
To You!
Marilyn


Link to these Parties
 
http://shabbyartboutique.com/2014/12/shabbilicious-friday-christmas-link-party-8.html

http://www.acreativeprincess.blogspot.com/2014/12/its-party-189.html

http://thriftydecorchick.blogspot.com/2014/12/christmas-tree-party-2014.html

http://ivyandelephants.blogspot.com/2014/12/christmas-blues.html

Thursday, December 18, 2014

Christmas Card Placemat DIY


 Thank you Grandma Clara for this DIY!


Do you save your Christmas Greeting Cards?  I am one Crazy lady that has saved every Christmas Card since 1970!

I was lucky enough to have a wonderful Crafty Grandma who I dearly loved.  She show me how to make these placemats.
After I married, I started keeping them and still do.  She passed shortly after and never got to see how I loved this craft.  Think of you often Grandma!

I first made mine when my girls were young, Below is one of my very first ones.
They do last for years, and can be wiped off with soap and water.


The modern word has easy electronic ways to send greetings.   I may be sentimental , but I look forward to receiving these great cards.  Sometimes, it is only once a year to hear from a distant
but dear friend.  Fewer Cards come each year, hopefully it never ends.

Now, I know they still sell Christmas Greeting Cards, so there must be others who enjoy sending and receiving them.  I just can!t throw them out!  I do display mine each year.  It!s one time of the year, I enjoy checking my mailbox.  


Over the years, having two daughters, gave me pleasure in making them for each family.  When the grandchildren were old enough,  we made them together. I was thinking someone may just carry this tradition on?   One time I had soooo many Cards that I even made a big stash of placemats and gave them to a Senior Center.  I should do that again!  

Now the last time I made them with the Grandkids I let them pick out their cards to make a placemat for each of their family members.  So cute to see their choices, I do not have a picture of them, darn!
But when cutting off the backs of each card for them, I noticed all the great personal notes written by loved ones.  Also, over the years, how many love ones that had passed, memories!  How could I throw them away!  So, the idea of using the back greeting piece with wonderful personal notes and drawings, for the back side of the placemat started.


I have been wanting to share my new updated version of Grandma's
wonderful Greeting Card Placemats, some may remember these from years pasted?  

So, if you don't save your greeting cards, maybe you would like to
start?

You will need:
greeting Cards
Glue stick
poster boards
Clear Contact Paper

Happy Holidays to All,


Sunday, December 14, 2014

Ugly to Unique Keeper Buffet


This once ugly piece, took several months working on the redo, even more time to get this heavy piece in the house.  78 inches long and on wheels.  She is perfect in our foyer and located right across from the formal dining room.


BEFORE 


The middle drawer was beyond repair for me, so I added a shelf for large serving platters.

More AFTER


This piece was big and ugly, but I saw details and a future, not knowing at the time, I would keep it for myself.


This was last Xmas 2013 displaying my Santa items!
 
Now to work on doing my post for 2014 Xmas Décor. You will see this piece again, but several new DIY Christmas items that I did manage to finish for this year.  Tis the season to be busy and jolly!

Wishing all a great Holiday Season,
Marilyn


Sharing at these Parties:


Tuesday, October 14, 2014

Fall and Pumpkin 2014 Decor


Pumpkins, Pinecones, Sunflowers, and Cat Tails my favorite for Fall!

Fall is in the air, leaves are changing and decorating for fall
is fun.  You can still use most everything for Halloween and Thanksgiving,  just add Spooky for Halloween and then Turkey items for Thanksgiving.  That's 3 Décor Decorating times until Xmas, no other time can you leave you hard work out that long to enjoy!

 I have a new Tablescape with a Tutorial,  a new Fall Mantel
Décor, with an easy Banner.  Front Porch Fall Décor, and just some Fall Décor.  


I love Pumpkins, to look at and EAT!  I wanted Just Pumpkins for my Tablescape but nothing to put them on?  I also did not have just the right candle holders, but no problem after a few days this is what I came up with.


Pine Cones from local trees in a Mason Jar!
Just painted the lids, perfect size to hold the candles.

I had these fence boards from another project, but they are very inexpensive.  I just cut them to the size I wanted, then cut two for the bottom.  I did not want the legs to show, so I cut them shorter.
these serve two purposes, holds the three top boards together and I wanted to easily lift the whole wooden tray for room when eating in large groups.


I get in a hurry when doing some projects, didn't want to get the drill out and drill bits, so easy peasy, just nail a hole to easily get your screw in, they go in sooo much easier


I had these stain for the other project I did not do,
so glad I saved them.  Now they are ready to White Wash.


I just used some diluted white paint on a
dry brush, just play with it until you like the
distressed look.


I loved arranging my stash of pumpkins, this worked for me.


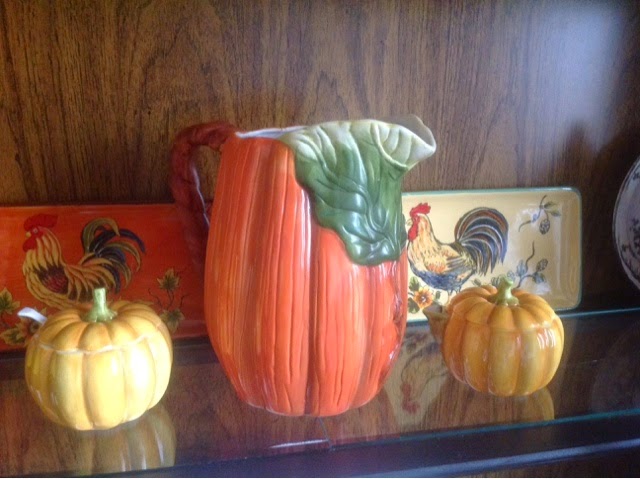
I did this hutch a few years ago and enjoy changing it up for all occasions.  All the pumpkin items were bought at, yes
Thrift stores and Garage sales!


Cutest pumpkin sugar and creamer!


OK, I need your help, anyone know anything about these Pumpkin side dishes I bought in early 1980's.  There is an "S" on the bottom but no luck for me finding the maker.


These dishes are gold, not a good picture here.


Now for the Fall Mantel Décor


This is my first home of many NOT have a Mantel,
Oh, I have had fireplaces, but no Mantel.  So I take great pleasure in finally Decorating it.


I had this webbing, over a year now, knowing I would do something with it someday!  You know when your out and about and see something you like, get it!  That my motto!


This is all I did, and I have plenty left Too!

Before we go outside, this is my hanging wreath as
you exit.  I put this outside last year on the house, but without the Sunflowers.  Every changing things, sound
familiar?


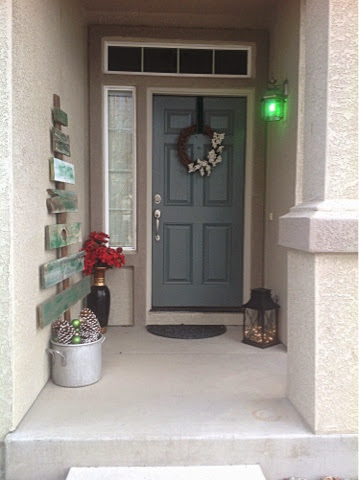
My porch décor is similar to last year, but a new wreath to match my fall vase décor.  I made the scrap wood pumpkin last year.


If you know me, I use Cat tails for everything,
they grew in abundance here, they fascinate me.


Well there you have it, I hope your Fall is Fabulous!
Take Care,

Marilyn

Fall Parties Here:


http://boogieboardcottage.blogspot.com/2014/10/make-easy-faux-vertical-mini-garden-and.html


http://www.astrollthrulife.net/2014/10/238th-inspire-me-tuesday_13.html


http://linda-coastalcharm.blogspot.com/2014/10/show-and-share-no232.html


http://www.funkyjunkinteriors.net/2013/03/sns-178-reclaimed-wood-projects.html


http://modvintagelife.blogspot.com/2014/10/mod-mix-monday-171.html